"Ball-in-Court" Workflows: The Next Enhancement to ProjectSight
Walking through the construction of a workflow template using ProjectSight's latest feature update.


In recent months, the team at ProjectSight has rolled out an entirely new feature in the portfolio and project settings: “ball-in-court” workflows. Prior to this enhancement, ProjectSight users were restricted to creating statuses for each of their records with minimal ability to silo responsibilities or create a streamlined blueprint for approvals. The image below is an example of that previous feature, one that you can still utilize if you prefer that over the new workflow tool.
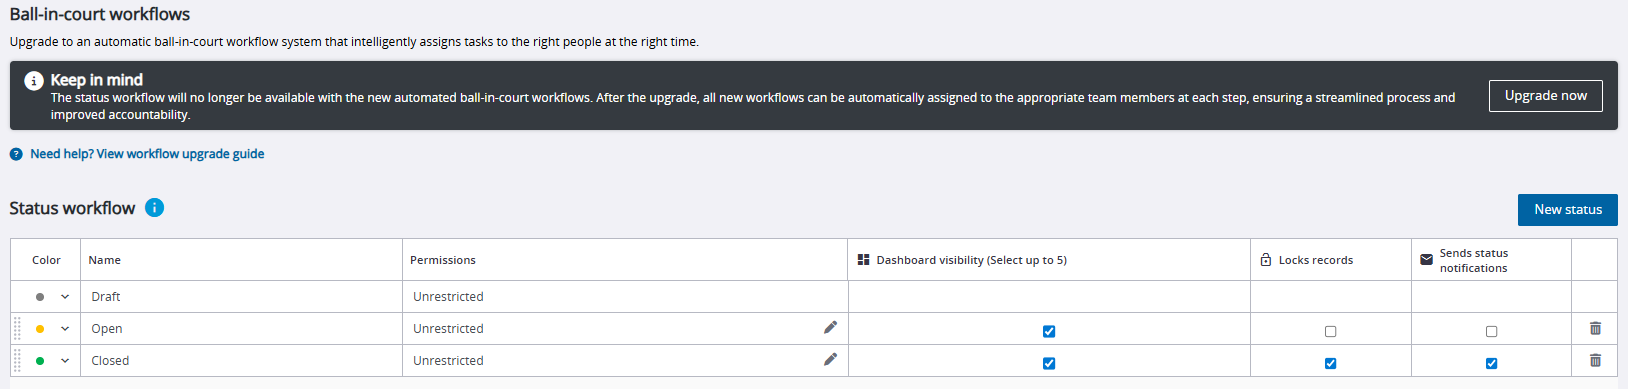
To begin work on a “ball-in-court” workflow template, select the “Upgrade now” box in the black ribbon at the top of your screen. Be aware that utilizing a new workflow may affect your integration with your existing ERP, so contact your integration consultant prior to working with this tool.
Once you select that box, your Workflow module will convert this screen. In the “Manage statuses” box on the righthand side, you can still add/edit/delete any statuses in your workflow, similar to how you would in the previous iteration of the Workflow module.

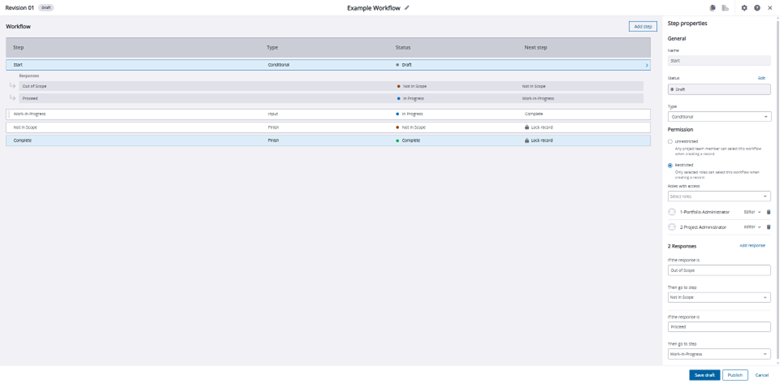
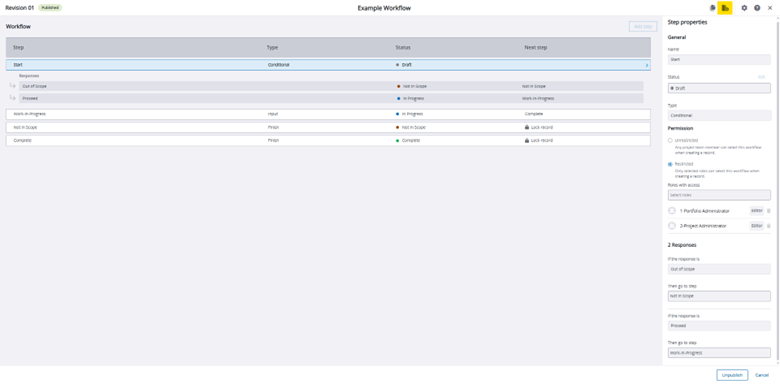
Once you feel comfortable with your status titles and colors, select the blue “Add” button to begin work in your new workflow. I created the example template below for today’s blog post.

To customize each step of your workflow, utilize the “Step properties” toolbar on the righthand side of your screen. I currently have my first step, “Draft”, selected, allowing me to make edits to that task. There are three main sections to complete within a task: General, Permission and Responses.
General

Within this section, you can name your step and assign it a status. In the screenshot above, those two boxes are grey because those features a step with the “Draft” status cannot be edited. Within the third box, Type, you have three options:
Input – Requires that this step have one response to proceed to the next step.
Conditional – Requires that this step have two responses that proceed to separate next steps.
Finish – Locks the record and marks it as “complete.”
Permission
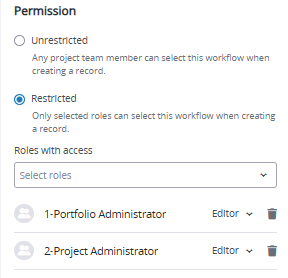
You have two options for types of restrictions to your workflow template:
Unrestricted – Any member of the project can add this workflow to a record within the Punch Items module, no matter their security role.
Restricted – Allows only users from a selected role, in this case Portfolio Administrators and Project Administrators, to attach this workflow to a record in the Punch Items module. This is our recommended permission setting.
Response
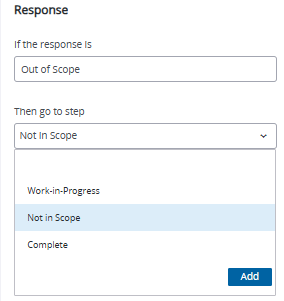
Finally, we have settings dictating the flow of the task itself. In this instance, I set the response to “Out of Scope” and my response in the drop-down would send this task to the “Not in Scope” status, thus ending the workflow upon that next step.
Once I am satisfied with my work, I can select the “Publish” button in the bottom right corner. When a workflow template is published, it cannot be edited. Instead, you must select the highlighted revision button in the top right corner and begin work on a template of the same title but designated “Revision 02”.
Creating a workflow can be a complicated process but can save time in the long run. In my next blog post, I will demonstrate this workflow and analyze how these new enhancements can improve your ProjectSight experience. In the meantime, if you have any questions regarding ProjectSight’s workflow capabilities or are interested in adding this software to your company's report management repertoire, please visit our website - ConstrucTech Consulting - and Book a Call with one of our consultants.
In recent months, the team at ProjectSight has rolled out an entirely new feature in the portfolio and project settings: “ball-in-court” workflows. Prior to this enhancement, ProjectSight users were restricted to creating statuses for each of their records with minimal ability to silo responsibilities or create a streamlined blueprint for approvals. The image below is an example of that previous feature, one that you can still utilize if you prefer that over the new workflow tool.
To begin work on a “ball-in-court” workflow template, select the “Upgrade now” box in the black ribbon at the top of your screen. Be aware that utilizing a new workflow may affect your integration with your existing ERP, so contact your integration consultant prior to working with this tool.
Once you select that box, your Workflow module will convert this screen. In the “Manage statuses” box on the righthand side, you can still add/edit/delete any statuses in your workflow, similar to how you would in the previous iteration of the Workflow module.
Once you feel comfortable with your status titles and colors, select the blue “Add” button to begin work in your new workflow. I created the example template below for today’s blog post.
To customize each step of your workflow, utilize the “Step properties” toolbar on the righthand side of your screen. I currently have my first step, “Draft”, selected, allowing me to make edits to that task. There are three main sections to complete within a task: General, Permission and Responses.
General
Within this section, you can name your step and assign it a status. In the screenshot above, those two boxes are grey because those features a step with the “Draft” status cannot be edited. Within the third box, Type, you have three options:
Input – Requires that this step have one response to proceed to the next step.
Conditional – Requires that this step have two responses that proceed to separate next steps.
Finish – Locks the record and marks it as “complete.”
Permission
You have two options for types of restrictions to your workflow template:
Unrestricted – Any member of the project can add this workflow to a record within the Punch Items module, no matter their security role.
Restricted – Allows only users from a selected role, in this case Portfolio Administrators and Project Administrators, to attach this workflow to a record in the Punch Items module. This is our recommended permission setting.
Response
Finally, we have settings dictating the flow of the task itself. In this instance, I set the response to “Out of Scope” and my response in the drop-down would send this task to the “Not in Scope” status, thus ending the workflow upon that next step.
Once I am satisfied with my work, I can select the “Publish” button in the bottom right corner. When a workflow template is published, it cannot be edited. Instead, you must select the highlighted revision button in the top right corner and begin work on a template of the same title but designated “Revision 02”.
Creating a workflow can be a complicated process but can save time in the long run. In my next blog post, I will demonstrate this workflow and analyze how these new enhancements can improve your ProjectSight experience. In the meantime, if you have any questions regarding ProjectSight’s workflow capabilities or are interested in adding this software to your company's report management repertoire, please visit our website - ConstrucTech Consulting - and Book a Call with one of our consultants.


Get Started
Take your construction company to the next level. Schedule your initial free consultation and analysis.